From one nightstand! (chill, it's seriously just a piece of furniture)
We’ve all spent hours scrolling through Pinterest, pinning a
million things to deliberately named boards for easy access once the stars
align. As most mothers/wives/adults can attest, the stars rarely align and if
they do we’d rather sit on the couch and drink a cup of coffee (to tide you
over until bedtime) or a glass of wine (don’t kid yourself, we deserve it) in
silence than tackle that “trash to class” refab (Refab? Refab?? That's not a word is it? Well it should be, it's like rehab but fabulous) that we’ve been planning in our
head since last November. I personally
have had a nightstand sitting in the corner of my garage (I’m lying it was on
my back porch because I’m that classy) for the past year and a half just
waiting for the stars to align so I could become the Super mom/Martha Stewart
that I know I am deep inside. And I do mean deep inside, deep, deep, deep, deep
beneath all of the unfunny Tina Fey and somewhat accurate Honey Boo Boo.
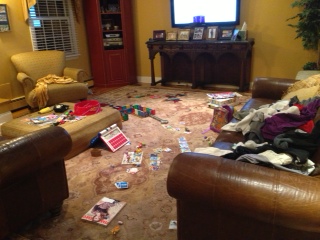 My husband refused to allow regular, metal dog crates in our
living room because that offended his delicate sensibilities or perhaps along
with the piles of laundry on the loveseat, toys from the kids strewn about next
to whatever else the toddlers were able to rip down and destroy, crates were
the line in the sand.
My husband refused to allow regular, metal dog crates in our
living room because that offended his delicate sensibilities or perhaps along
with the piles of laundry on the loveseat, toys from the kids strewn about next
to whatever else the toddlers were able to rip down and destroy, crates were
the line in the sand. 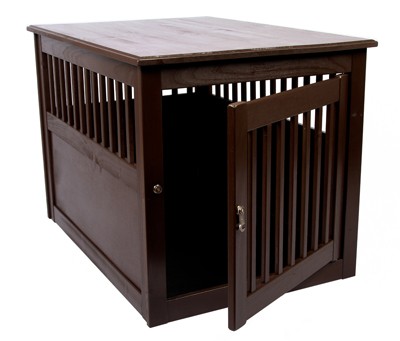
There were a multitude of helpful articles but since I can’t be bothered to read long explanations/directions because they’re too boring and I generally operate on the principle of “I’ve got it”. Were that not true and had I throughly read first, thing may have been easier but we’ll never know because I’m still not going to go read it and I think it turned out pretty great! I had a older, scratched up solid wood night stand that I turned into a dog bed/end table then used the drawers to make hanging shelves.
The picture to the left isn't the exact nightstand but it's very similar. I forgot to take before pictures. The picture below is the finished product.
 First, I removed the drawers from the nightstand and set
them to the side. I then sawed the middle beam that provided support for the
rail for the top shelf in half and removed it along with the rail that was
screwed into the back of the nightstand. It’s important to not just beat it
with a hammer (like I may or may not have initially tried to do) because since
it’s a nice solid wood piece of furniture that middle beam isn’t just stapled
in there but is held in place with a thick dowel on either side so it remains sturdy. Sawing
it in half first makes it much easier to access the situation and remove it
cleanly, as my husband made clear when he removed the hammer from my hand. Once
I had it gutted I sanded the outside down just enough to rough it up so the
paint will stick. If you’re a part time crafter like me you already have a
bunch of these supplies around such as sandpaper, paint, brushes etc. I then
wiped it clean with a damp cloth to remove any dirt and wood shavings. I used a
light purple satin paint that I already had as a base coat. Once it dried I
applied a very light teal/blue color over the top. Both dried nicely so I
didn’t need a third coat. Lastly I took my sandpaper and hit up the edges and a
few spots that might be worn if it was used daily. It sanded in places just
enough for the purple to show through and in others all the way to the wood
which also looked nice. I am a layman so there may be a better way but I
recommend sanding by hand because my sander leaves swirl patterns all over the
paint and even with light grade sand paper cuts through the paint and down to
the wood too quickly. You only need a light sanding to get though the paint.
After I was finished I decided I wanted the inside to look nicer so I taped off
the edges around the opening and spray painted it a matching light purple
color. Boom. Done and done. If I wouldn’t have had to wait for the paint to dry
it would have taken me less than an hour start to finish. Easy day. Soooo back
to Pinterest I went because I now had some nice drawers that my inner hoarder wouldn’t
let me just toss.
First, I removed the drawers from the nightstand and set
them to the side. I then sawed the middle beam that provided support for the
rail for the top shelf in half and removed it along with the rail that was
screwed into the back of the nightstand. It’s important to not just beat it
with a hammer (like I may or may not have initially tried to do) because since
it’s a nice solid wood piece of furniture that middle beam isn’t just stapled
in there but is held in place with a thick dowel on either side so it remains sturdy. Sawing
it in half first makes it much easier to access the situation and remove it
cleanly, as my husband made clear when he removed the hammer from my hand. Once
I had it gutted I sanded the outside down just enough to rough it up so the
paint will stick. If you’re a part time crafter like me you already have a
bunch of these supplies around such as sandpaper, paint, brushes etc. I then
wiped it clean with a damp cloth to remove any dirt and wood shavings. I used a
light purple satin paint that I already had as a base coat. Once it dried I
applied a very light teal/blue color over the top. Both dried nicely so I
didn’t need a third coat. Lastly I took my sandpaper and hit up the edges and a
few spots that might be worn if it was used daily. It sanded in places just
enough for the purple to show through and in others all the way to the wood
which also looked nice. I am a layman so there may be a better way but I
recommend sanding by hand because my sander leaves swirl patterns all over the
paint and even with light grade sand paper cuts through the paint and down to
the wood too quickly. You only need a light sanding to get though the paint.
After I was finished I decided I wanted the inside to look nicer so I taped off
the edges around the opening and spray painted it a matching light purple
color. Boom. Done and done. If I wouldn’t have had to wait for the paint to dry
it would have taken me less than an hour start to finish. Easy day. Soooo back
to Pinterest I went because I now had some nice drawers that my inner hoarder wouldn’t
let me just toss.
 I landed on turning them into hanging shelves. First I went
to Home Depot and bought a pack of D-ring for like $2 then hit up Joann’s and
bought a cute piece of burlap but any material or even scrapbook paper would
have worked. I used burlap because the print was super cute and it was on sale
50% off $9.99 a yard and I only needed half a yard. (When you go to a store like Joann's always, always, always go to their website on your phone and look for their coupons, there are usually great ones!) Once back home I used a
screwdriver to put the D-rings on, they went in with a little pressure, I
didn’t even need to use a drill. Then I removed the hardware with a
screwdriver, lightly sanded the outside, painted them with the two colors in
the same manner as before, sanded the points and put the hardware back on. I
took 4 sheets of paper, laid them in the bottom of the drawer, making sure the entire
bottom was covered to make a template for my burlap. I took that, laid it on
the burlap and cut it out making sure to add about a quarter inch to account
for any errors. I tested it in the bottom of the drawer and found that it would
be nearly perfect (thanks to that quarter inch margin of error). From another
project I had some spray adhesive that I found at the Dollar Tree for a buck so
I generously sprayed it on the bottom of the drawer, making sure to get a good
amount in and around the edges. I then laid the burlap in and used some small
paint cans and a flower pot to hold it in place as it dried. Boom. Done. It was
absolutely easy and incredibly cute!!!
I landed on turning them into hanging shelves. First I went
to Home Depot and bought a pack of D-ring for like $2 then hit up Joann’s and
bought a cute piece of burlap but any material or even scrapbook paper would
have worked. I used burlap because the print was super cute and it was on sale
50% off $9.99 a yard and I only needed half a yard. (When you go to a store like Joann's always, always, always go to their website on your phone and look for their coupons, there are usually great ones!) Once back home I used a
screwdriver to put the D-rings on, they went in with a little pressure, I
didn’t even need to use a drill. Then I removed the hardware with a
screwdriver, lightly sanded the outside, painted them with the two colors in
the same manner as before, sanded the points and put the hardware back on. I
took 4 sheets of paper, laid them in the bottom of the drawer, making sure the entire
bottom was covered to make a template for my burlap. I took that, laid it on
the burlap and cut it out making sure to add about a quarter inch to account
for any errors. I tested it in the bottom of the drawer and found that it would
be nearly perfect (thanks to that quarter inch margin of error). From another
project I had some spray adhesive that I found at the Dollar Tree for a buck so
I generously sprayed it on the bottom of the drawer, making sure to get a good
amount in and around the edges. I then laid the burlap in and used some small
paint cans and a flower pot to hold it in place as it dried. Boom. Done. It was
absolutely easy and incredibly cute!!! 

Comments
Post a Comment